Easily create an audience login with Firebase Studio and Gemini!
From time to time, it may happen during a talk that you want to interact with your audience at a conference.
What I commonly see is some form of feedback form, or some slide with contacts, but what happens if you want to interact with the audience more intimately? Probably you need a way for them to “Log” into your content?
It looked like a cool side project that could be done with Flutter (web in this case) and Firebase Studio, so I started experimenting on that!
How it started:
First of all, I needed a Plan, what do I want to do?
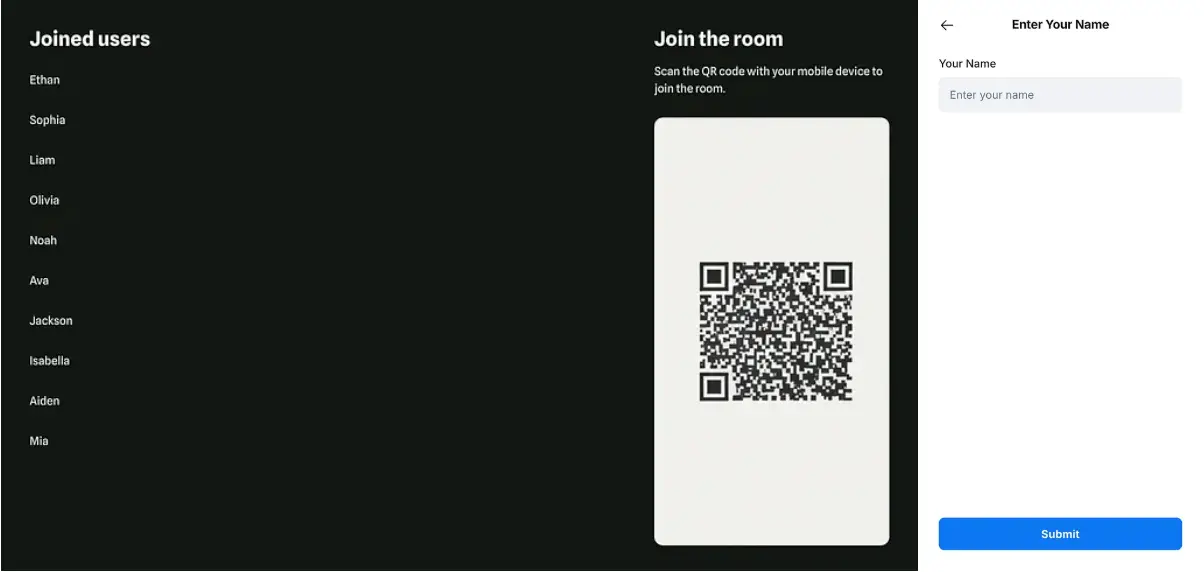
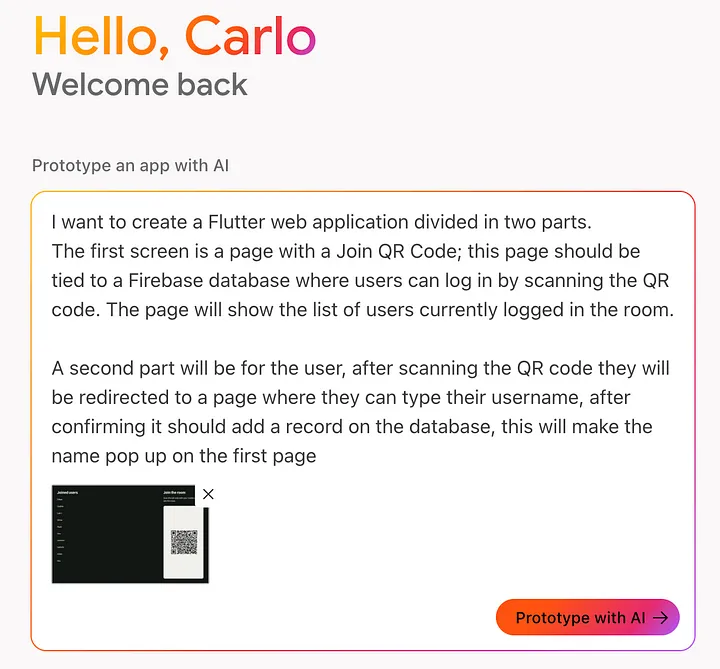
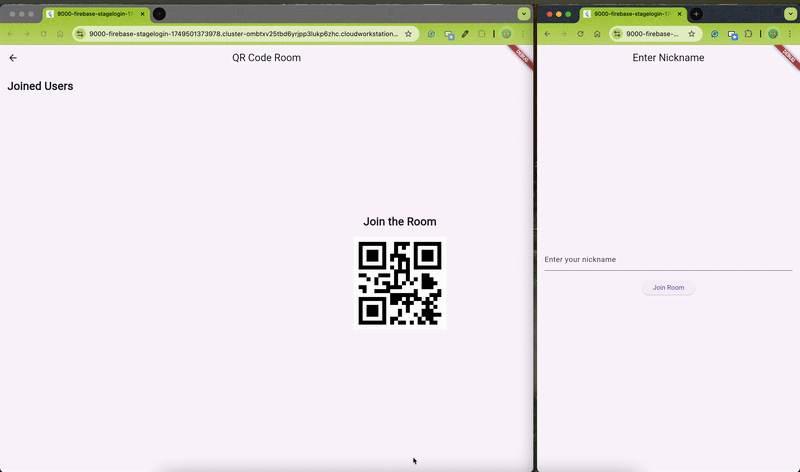
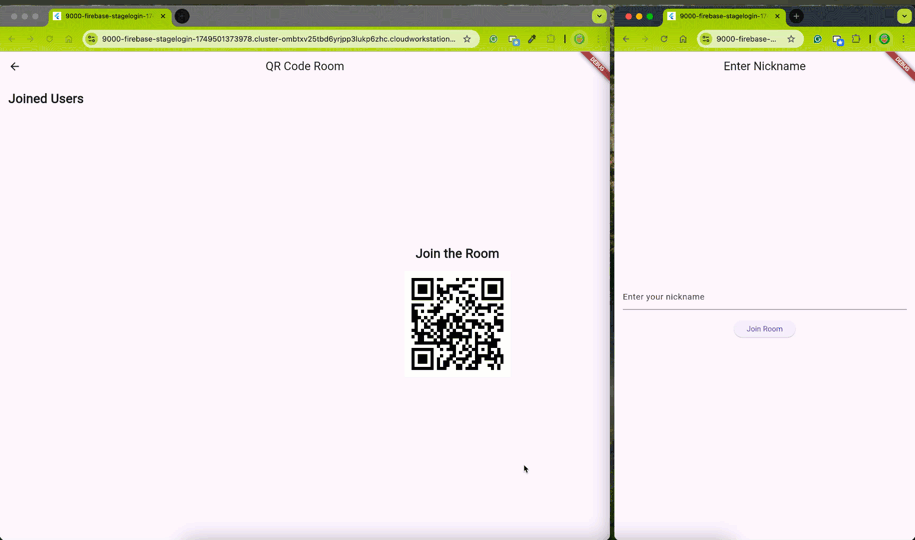
I want two main parts: a webpage that I can share during the presentation, which should include a QR code that users can scan to join the session, and a second webpage, accessible from the scanned QR code, where users can enter their Username and see it appear on the main page.
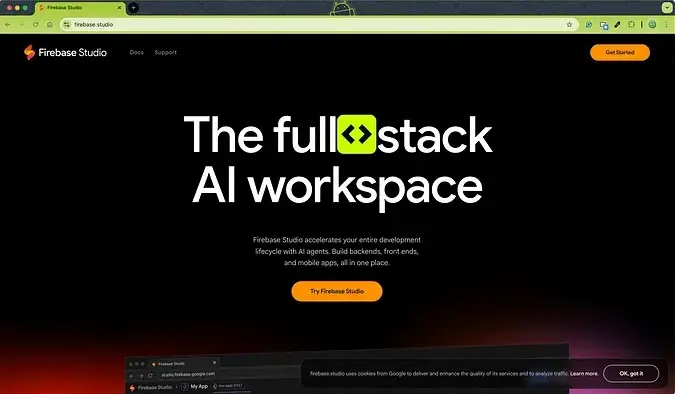
Probably, I will need some Firebase settings too, but let’s worry about that later. So, let’s jump into play and head to https://studio.firebase.google.com/.
After logging in, what I see is….
I’m not sure this will go well since this is my first time “Vibe” …coding? Let’s explain what I need, and let’s see what happens when I start the prototyping
. . .
Finger crossed…. aaand…

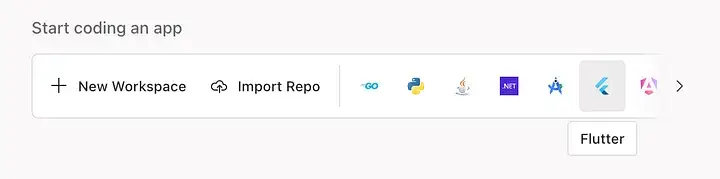
It wanted to use TypeScript, instead of Flutter… I mean, I could go full vibe code, but I also wanted this to be integrated in a Flutter project of mine, so I gently declined and went the “long route”, so instead of using the flashy AI box I went with the “Start coding an app” and the “Flutter button” just below that.
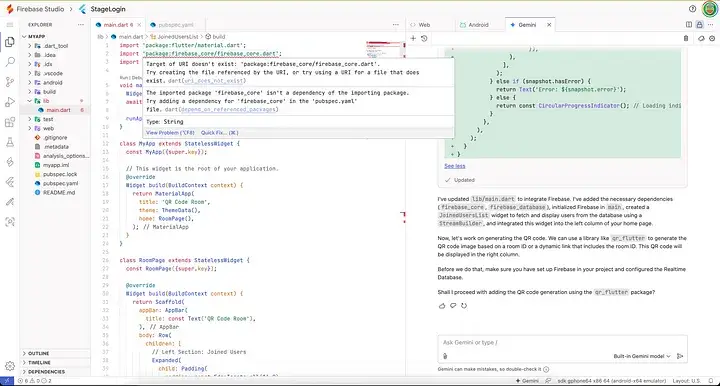
After being asked for a name (used StageLogin), I got redirected to the IDE.
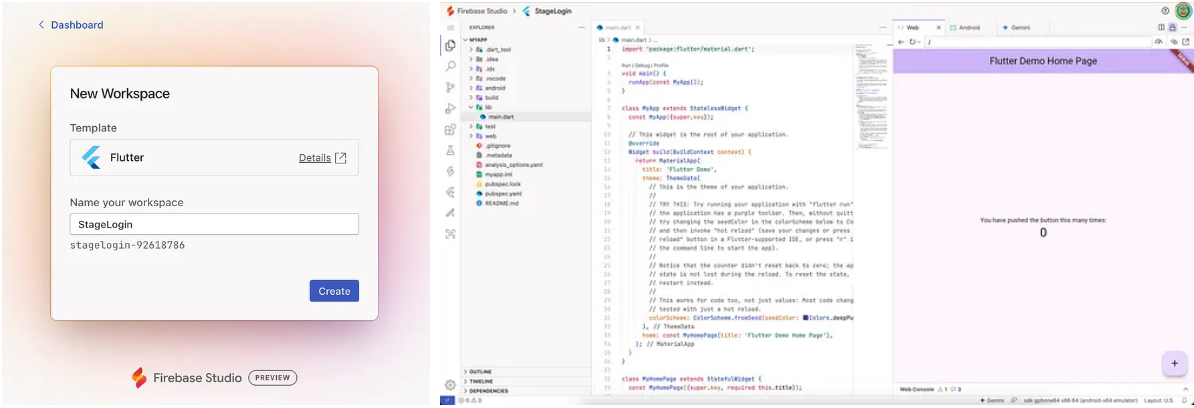
After a brief wait and the download of some dependencies, the sample application was up and running, and I saw the enticing “Gemini” button again. Let’s see if I can get my screen as intended now!
Copied the previous prompt, only the first part:
I want to create a Flutter web application divided in two parts. The first screen is a page with a Join QR Code; this page should be tied to a Firebase database where users can log in by scanning the QR code. The page will show the list of users currently logged in the room.
And added the screenshot made with Stitch, sent the message, and something happened…
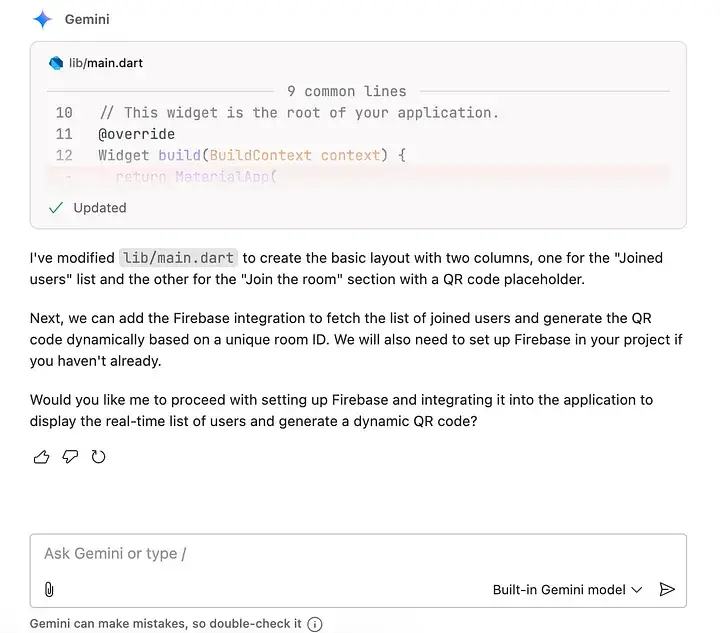
Uuuhh…. Is there any reason not to say “Please do?”
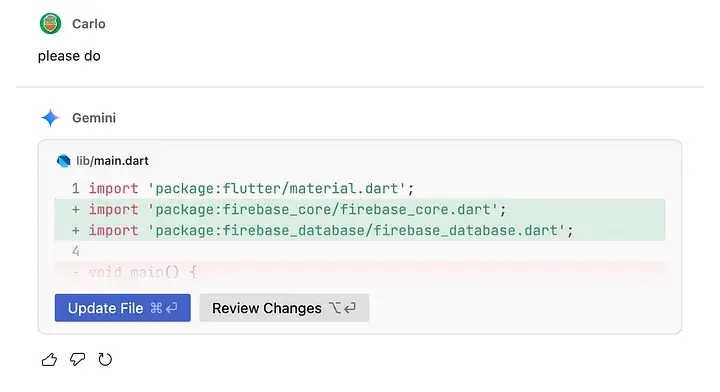
Accepting the changes, I got some minor errors, it looks like the code itself is fine, and even if I will need to fix the UI later to be more appealing, the page itself is rendered well.
The main issue is that the imports were added, but the dependencies were not.
Asked for the fix, but this time I got a less helpful message:
I can guide you through the process of setting up Firebase for your project, but I cannot directly execute the Firebase setup commands or configure your Firebase project settings from here. Setting up Firebase typically involves:
Creating a Firebase project: Go to the Firebase console (https://console.firebase.google.com/) and create a new project.
Registering your app: Register your Flutter web app with the Firebase project. This will involve providing your app’s details and downloading a configuration file (e.g.,
firebase_options.dartfor Flutter).Adding Firebase configuration to your app: Add the downloaded configuration file to your Flutter project.
Adding Firebase dependencies: You’ve already added
firebase_coreandfirebase_databasein the previous step, but you might need other dependencies depending on the Firebase features you plan to use (e.g., Authentication, Firestore).Initializing Firebase in your app: You’ve already added the initialization code in
main.dart.Once you have completed these steps in the Firebase console and added the necessary configuration files to your project, the Firebase integration I added to
lib/main.dartshould work.
But… I don’t want to make all this work!
Luckily, we have tools for that! Firebase and FlutterFire!
Thanks to the integration with Firebase Studio, you already have all you need to use. So let’s run firebase login and flutterfire configure After running the first command (login), simply follow the instructions to log in to your Firebase account. Then with flutterfire configure, after a few steps, your code will be automatically updated to be ready to work with Firebase! All without even needing to go to the console.
stagelogin-00997488:~/myapp$ flutterfire configure
i Found 11 Firebase projects.
✔ Select a Firebase project to configure your Flutter application with · <create a new project>
✔ Enter a project id for your new Firebase project (e.g. my-cool-project) · hatdroid-stage-login
i New Firebase project hatdroid-stage-login created successfully.
? Which platforms should your configuration support (use arrow keys & space to select)? ›
android
ios
macos
✔ web

i Firebase web app myapp (web) is not registered on Firebase project hatdroid-stage-login.
i Registered a new Firebase web app on Firebase project hatdroid-stage-login.

Firebase configuration file lib/firebase_options.dart generated successfully with the following Firebase apps:

Platform Firebase App Id
web x:xxxxxxxxxxxx:web:xxxxxxxxxxxxxxxxxxxxxx
Now we just need to add the dependencies:
stagelogin-00997488:~/myapp$ flutter pub add firebase_core
stagelogin-00997488:~/myapp$ flutter pub add firebase_database

Resolving dependencies...
Downloading packages...
+ firebase_core 3.13.1
+ firebase_core_platform_interface 5.4.0
+ firebase_core_web 2.23.0
+ _flutterfire_internals 1.3.55
+ firebase_database 11.3.6
+ firebase_database_platform_interface 0.2.6+6
+ firebase_database_web 0.2.6+12
...
Changed X dependencies!
And since we are using firebase_database I also needed to create a new database, so head to https://console.firebase.google.com/, open your project, tap on the Realtime Database, and then create it. You can find a complete guide here: https://firebase.google.com/docs/database/flutter/start
And after creating the database, you need to update the firebase_options.dart to include the database information:
static const FirebaseOptions web = FirebaseOptions(
apiKey: 'YOUR-API-KEY',
appId: 'YOUR-APP-ID',
messagingSenderId: 'YOUR-MESSAGING-ID',
projectId: 'YOUR-PROJECT-ID',
authDomain: 'YOUR-AUTH-DOMAIN',
databaseURL: 'YOUR-DATABASE-URL', // <--- THIS ONE ---
storageBucket: 'YOUR-STORAGE-BUCKET',
);
You can either pick it from your console, or the easier way is to call again flutterfire configure after the creation of the database.
Now the application is ready to accept and read the list! The next step is to add the QR Code, as easy as asking:
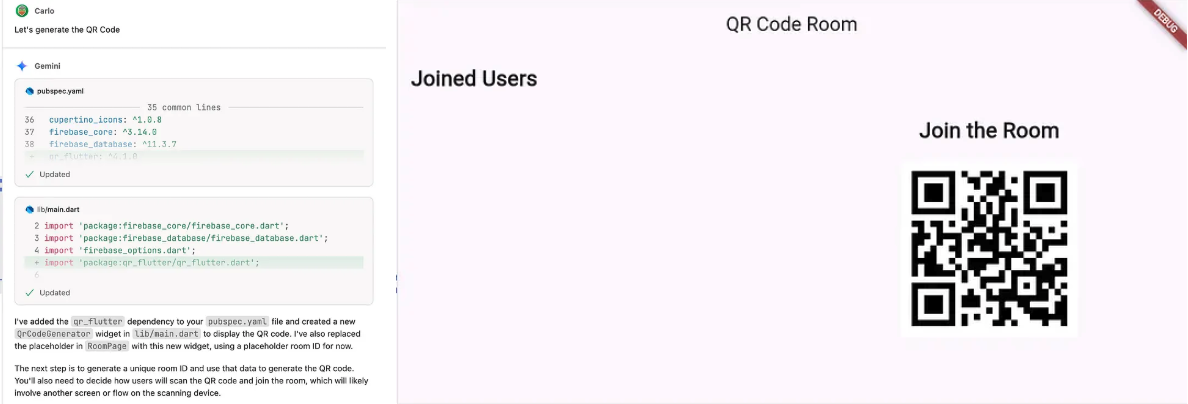
For now, a single placeholder ID is used for the room generation and the database assignment, so both the QR code and the list will use the same ID to communicate. A variable will later manage this!
Now, let’s focus on the second screen!
Let’s generate the reader route now! I want the user that read the QR Code to navigate to a second route, that uses the ID inside the QR Code to connect said user into the database, the user must add a Nickname that will be shown live in the first route, add also a button to submit
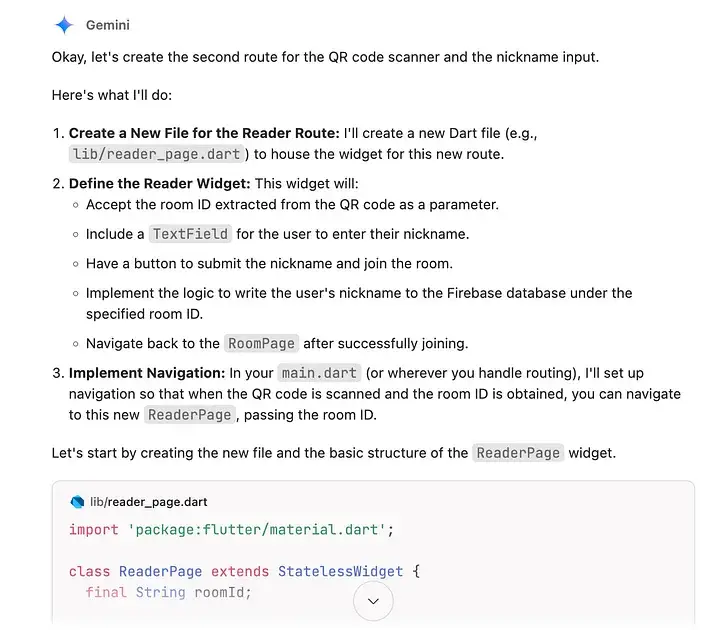
Let’s change the navigation first. I asked to add GoRouting to handle named navigation, the first route should be reachable by /<roomId> While the second page should be reachable by /join/<roomId>
Okay, let’s integrate
go_routerfor named navigation in your application.Here’s the plan:
Add
go_routerDependency: I'll add thego_routerpackage to yourpubspec.yaml.Configure
GoRouter: In yourmain.dart, I'll set up theGoRouterwith two routes:
/: This route will handle theRoomPageand accept an optionalroomIdparameter in the URL (e.g.,/or/someRoomId).
/join/:roomId: This route will handle theReaderPageand require aroomIdparameter in the URL (e.g.,/join/someRoomId).
After this quick change, the application is ready to be used!, I added another minor change. Another confirmation page that uses the ID we get from the Firebase push to show the user who has just joined the room.
import 'package:flutter/material.dart';
import 'package:firebase_database/firebase_database.dart';
import 'dart:convert';

class ConfirmationPage extends StatelessWidget {
  final String roomId;
  final String userId;

  const ConfirmationPage({Key? key, required this.roomId, required this.userId})
    : super(key: key);

  @override
  Widget build(BuildContext context) {
    final DatabaseReference userRef = FirebaseDatabase.instance.ref(
      '/rooms/$roomId/users/$userId',
    );
    // .ref('/rooms/testId/users/-OSmPny5xYb3d22ccJer')
    //.child(userId);

    return Scaffold(
      appBar: AppBar(title: const Text('Welcome!')),
      body: Center(
        child: FutureBuilder<DatabaseEvent>(
          future: userRef.once(),
          builder: (context, snapshot) {
            if (snapshot.connectionState == ConnectionState.waiting) {
              return const CircularProgressIndicator();
            } else if (snapshot.hasError) {
              return Text('Error: ${snapshot.error}');
            } else {
              final value =
                  snapshot.data?.snapshot.value as Map<dynamic, dynamic>?;

              final username = value?['username'] ?? userId;
              final profileImage = value?['avatar'];

              return Column(
                mainAxisAlignment: MainAxisAlignment.center,
                children: [
                  Text(
                    'Welcome, $username!',
                    style: const TextStyle(
                      fontSize: 24,
                      fontWeight: FontWeight.bold,
                    ),
                  ),
                  const SizedBox(height: 20),
                  Container(
                    width: 100,
                    height: 100,
                    decoration: BoxDecoration(
                      shape: BoxShape.circle,
                      image:
                          profileImage != null
                              ? DecorationImage(
                                image: MemoryImage(base64Decode(profileImage)),
                                fit: BoxFit.cover,
                              )
                              : null,
                      color: Colors.grey[300], // Placeholder color
                    ),
                    child:
                        profileImage == null
                            ? const Icon(
                              Icons.person, // Placeholder icon for no image
                              size: 80,
                              color: Colors.grey,
                            )
                            : null, // No placeholder icon if image is present
                  ),
                ],
              );
            }
          },
        ),
      ),
    );
  }
}
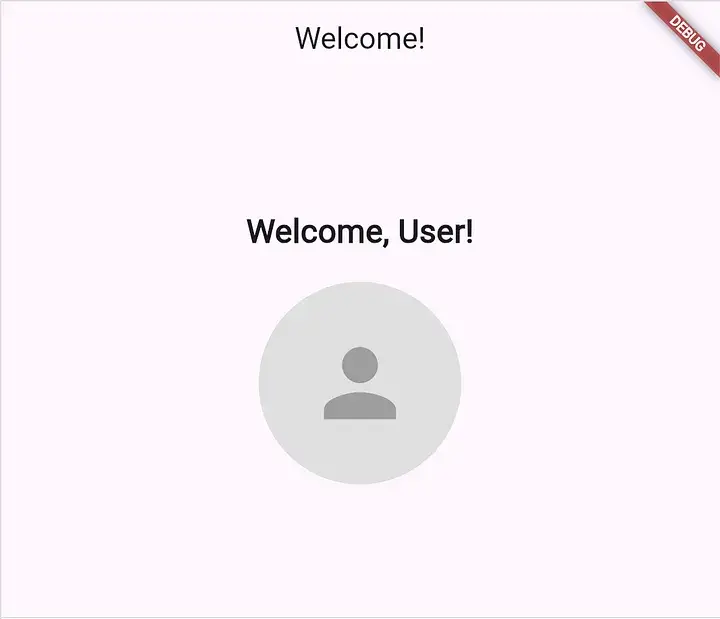
Let’s check the Navigation aaaaaand…
Everything works as intended! But let’s take an extra step: I want the app to generate an image for each user, based on their username. So let’s modify our _addNickname method!
Right now, this is the code that Gemini generated for me:
void _addNickname() async {
    final nickname = _nicknameController.text.trim();
    if (nickname.isNotEmpty) {
      try {
        await _roomRef.push().set(nickname);
        context.go('/joined/${widget.roomId}/$nickname');
      } catch (e) {
        // Handle potential errors, e.g., show a SnackBar
        print('Error adding nickname: $e');
      }
    }
  }
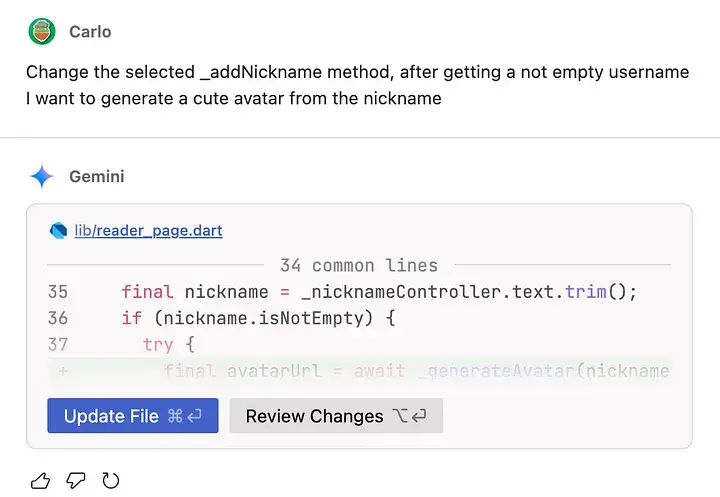
Let’s review the changes, and we quickly see that it is not what I want.
void _addNickname() async {
final nickname = _nicknameController.text.trim();
if (nickname.isNotEmpty) {
try {
final avatarUrl = await _generateAvatar(nickname);
await _roomRef.push().set(nickname);
context.go('/joined/${widget.roomId}/$nickname?avatar=$avatarUrl');
} catch (e) {
// Handle potential errors, e.g., show a SnackBar
print('Error adding nickname: $e');
}
}
}

Future<String> _generateAvatar(String nickname) async {
// This is a placeholder. Replace with your actual avatar generation logic.
return 'https://api.adorable-avatars.kolibridev.com/avatars/face/$nickname';
}
Let’s do the old coder way, writing code by using my brain! (and some documentation, of course)
What I need here is to first generate an image, and then save that in Firebase. Let’s see the documentation here: https://firebase.google.com/docs/ai-logic/generate-images-gemini
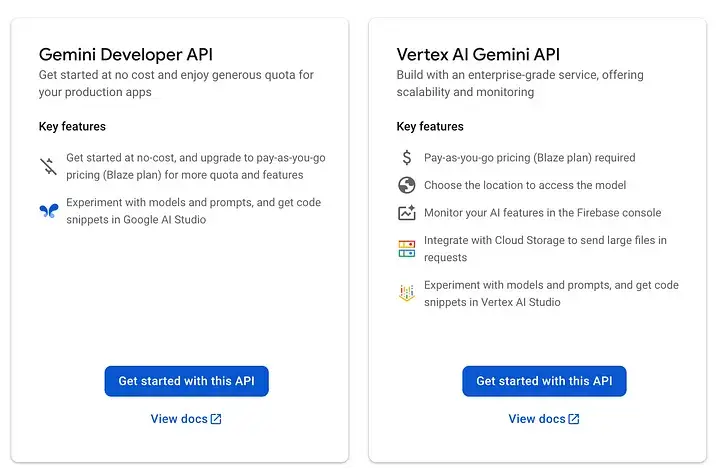
First, I need to add the firebase_ai plugin, as easy as calling flutter pub add firebase_ai On my console, I need to enable Firebase on the Cloud Console. This can be done by navigating to https://console.developers.google.com/apis/api/firebasevertexai.googleapis.com/overview?project=YOUR-PROJECT-NUMBER. Do not worry! If you skip this step, you will get an error with the correct URL the first time you attempt to run! (CODE BY ERROR ITERATION! YAY!).
Last, You need to enable firebase ai From the Firebase console https://console.firebase.google.com/project/YOUR-PROJECT-NAME/ailogic for image generation, we need to use Vertex Ai Gemini APIinstead of Google Developer API
Now, let’s create a Method to generate an image using a simple prompt:
Future<String?> _generateImage(String username) async {
final model = FirebaseAI.vertexAI().generativeModel(
      model: 'gemini-2.0-flash-preview-image-generation',
      generationConfig: GenerationConfig(
        responseModalities: [ResponseModalities.text, ResponseModalities.image],
      ),
    );

final prompt = [
      Content.text(
'Generate a cute svg like avatar based for the user called: $username '
'do not include any kind of text',
      ),
    ];

final response = await model.generateContent(prompt);
if (response.inlineDataParts.isNotEmpty) {
final bytes = response.inlineDataParts.first.bytes;

final image = img.decodeImage(bytes);
if (image != null) {
final resizedImage = img.copyResize(image, width: 100, height: 100);
return base64Encode(img.encodePng(resizedImage));
      } else {
return null; // Or handle the error appropriately
      }
    } else {
return null;
    }
  }
Let’s break it down,
First, I expect to return a Future<String?> I use the nullable here just in case the image can’t be generated for any reason, then I provide a String username Gemini will use that for the generation.
final model = FirebaseAI.vertexAI().generativeModel(
model: 'gemini-2.0-flash-preview-image-generation',
generationConfig: GenerationConfig(
responseModalities: [ResponseModalities.text, ResponseModalities.image],
),
);
Here, I create an instance of GenerativeModel, from the vertexAI instance of FirebaseAi I call the .generativeModel method and provide the following informations:
- Model name
This is the model we will use. A comprehensive list of the models can be found on the Firebase models page. After a quick look, the only options we have for Image generation aregemini-2.0-flash-preview-image-generationOr, I can use Imagen models, but since I don’t need an extremely detailed image, I will go with the Gemini model. - Generation Configs
Here we can provide several informations, the one we need is theresponseModalitiesparameter. I provide both text and image. Ideally, I need only the image, but this model won’t comply if I don’t get the text as well.
final prompt = [
Content.text(
'Generate a cute svg like avatar based for the user called: $username '
'do not include any kind of text',
),
];

final response = await model.generateContent(prompt);

Then I create a text prompt, and use that prompt to call the GenerativeModel.generateContent method, I await the response to get the GenerateContentResponse if (response.inlineDataParts.isNotEmpty) { final bytes = response.inlineDataParts.first.bytes; final image = img.decodeImage(bytes); if (image != null) { final resizedImage = img.copyResize(image, width: 100, height: 100); return base64Encode(img.encodePng(resizedImage)); } else { return null; } } else { return null; }
Finally, what I do is to check the inlineDataParts and take the first if it does not exist, then I resize the image to a size I like by using the image package and encode that to a base 64 string by using dart:convert .
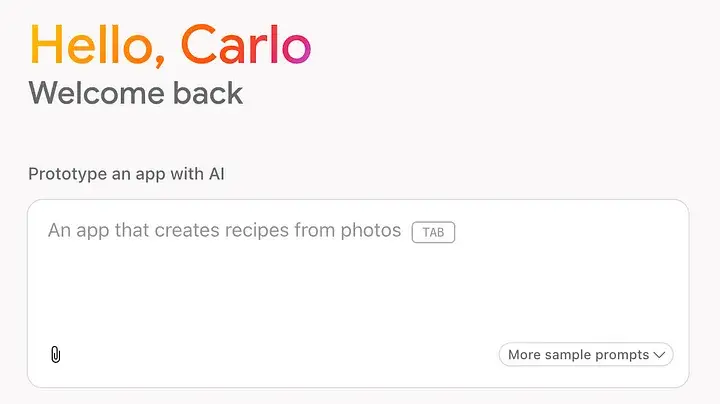
I try the image on “HatDroid” username and…

Well! The image generation is complete! Now let’s modify the reader page _addNickname to use the newly generated image
void _addNickname() async {
final username = _nicknameController.text.trim();
if (username.isNotEmpty) {
try {
//Generate the image
final avatar = await _generateImage(username);
//Generate the child reference
final ref = _roomRef.push();
//Write the value inside the reference
await ref.set({'username': username, 'avatar': avatar});
//Navigate to the confirmation page
if (context.mounted) {
context.go('/joined/${widget.roomId}/${ref.key}');
}
} catch (e) {
print('Error adding nickname: $e');
}
}
}
Last round of testing….
WONDERFULL! Exactly what I needed!
Some Conclusion!
In a few hours (6/8), thanks to Gemini and Firebase Studio, I was able to:
- Create a page showing a QR Code and a list of users currently connected to a Firebase Realtime Database room.
- Create a page, accessible via the QR Code, where users can input a username to join the room.
- Generate an image using the Firebase AI API and a Gemini model starting from the username.
- Create a page to show the current username and the generated avatar
All by just asking Gemini to add things and manage my requests!
What did I learned?
Gemini and Firebase Studio are powerful tools, not yet perfect (sometimes I had to manually fix something or configure something else), but indeed a valuable help in prototyping! I plan to use this newly created login on my https://randomwinner.it page (A random name generator with a fun twist) to let conference users join some raffles!
You can find the repository here: https://github.com/CLucera/HatDroidStageLogin/tree/original-code.
I will leave this branch as it was created during this experiment to showcase what was generated directly with minimal effort on my side! But will add several improvements to the main branch later to be able to really use it in a production setting!
Written by Carlo Lucera (HatDroid)